This is the second in a series about importing Word documents into MindManager (MM). In the first part I looked at the options for importing paragraph-based documents and retaining the heading structure in the topic hierarchy of the resulting mind map. In this part I’ll discuss how to import various types of tables from Word and also Excel.
This is something I first looked at in a post five years ago which in turn drew on the work of Andrew Wilcox who discovered that just as in a document structured with paragraphs, a Word table to which Word heading styles have been applied will develop an appropriate topic hierarchy when imported to MM – though there are some catches. In a more recent post I also looked at the use of Excel pivot tables to assist in the importing process.
In this post I’ll try to bring together and update these different approaches and also introduce some other ideas – including a surprisingly simple one which makes table importing a lot easier.
The main table types
Tables and spreadsheets can be structured in so many different ways but unfortunately while their layout may appear logical to readers they usually provide very few clues for MM to latch on to establish up a topic hierarchy which reflects this logic. This post explains how to overcome this problem but first you need to understand which broad type of Word table or Excel spreadsheet you are dealing with:
1. Simple “flat” table with ungrouped rows: Effectively this is an ungrouped simple list such as, for example, a list of attendees at a function or an organisation membership, typically with the person’s name in the first column. The resulting maps are comparatively flat; the first column forms the main topics, each with only one branch containing a cascading set of subtopics representing the other information. Additional material may be contained in the topic notes.
2. Hierarchical table with grouped rows: These more complex tables are often sorted and grouped by organisation or department (for example, in the case of contact lists) or by type, location or other category (in the case of product catalogues or similar tables). These groupings usually make up the first columns of the table. These groupings can be represented graphically through a map hierarchy with the first column forming the main topics which will have multiple branches. Again, additional material may be contained in the topic notes.
3. Indented outline table (or Excel pivot table): These are a special type of hierarchical table in which every cell appears in indented columns and on a separate row. They are more commonly found in spreadsheets. They are also one way that tables can be imported without using Word heading styles, particularly from Excel, though this approach has some limitations. I’ll discuss these later, as well as the ways in which pivot tables themselves can be used to assist in the importing of other table types (see Appendix 1).
It’s also important to note at this point that almost all the processes described in this post (particularly for importing the first two table types) are undertaken within Word and in some cases Excel rather than MM, so it helps to be reasonably familiar with these programs as well as with MM. This brings us to versions; I’m using MM version 16 and Word and Excel 2010.
These techniques should work with all recent versions of MM and Word/Excel but the capabilities and compatibilities of these programs change over time so I can’t guarantee that they will. They should also work with tables exported to Word or Excel from other programs which can’t talk to MM directly.
Suggested preliminary one-off steps
While they are not strictly essential, there are a couple of things you can do in Word to make the process of transferring a table to MM a lot easier, especially when dealing with larger and more complex grouped tables,. These preliminary steps are:
- Incorporating MM Word styles into Word (see Appendix 2); and
- Installing macros to remove formatting from blank cells in the table and make hyperlinks “live” (see Appendix 3).
The appendices describe the one-off steps required to install these features. The instructions below for importing tables outline how these features are used once you have installed them.
Table Importing 1: simple “flat” tables with ungrouped rows
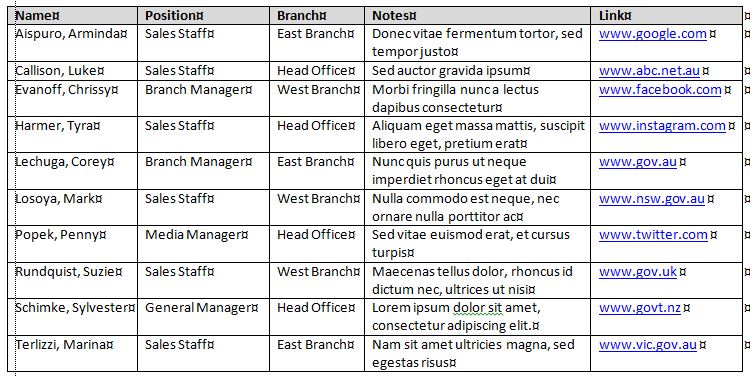
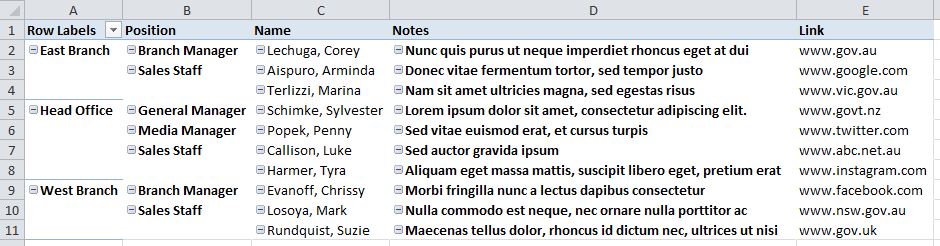
I’ve set up the following hypothetical table for the staff of an equally hypothetical company, sorted by the names of the mythical employees. The other fields are the staff positions, their branches, notes for each employee and a hyperlink (for these I’ve used actual websites but the techniques work equally well with email links):
There are four main steps to import a “flat” table like this:
1. Structure the table correctly
Copy the table to a new blank document created with the template containing the MM paragraph styles (assuming you are going to import specialised fields – see the preliminary steps section above), then structure the table in a similar way to the example above. The cells in the first column will become the main topics, the second will form the first level of subtopics and so on.
2. Apply the appropriate Word styles to the table
Using the above example, highlight the first column (Name) and apply the Word Heading 1 style, then apply the Heading 2 and 3 styles to the Position and Branch columns respectively (if the styles have outline numbering you should remove this or use styles without numbering).
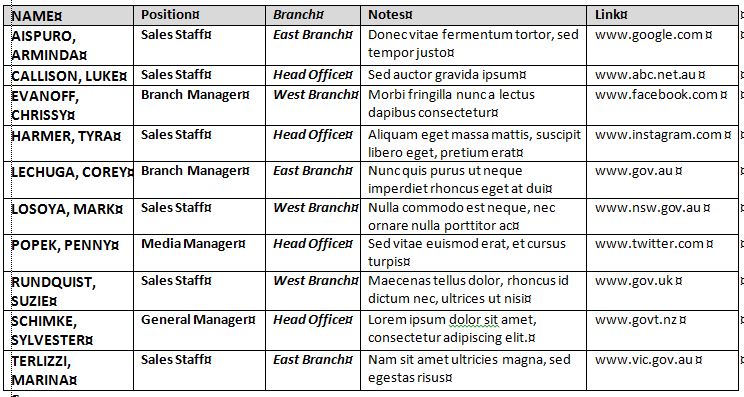
Check that the Notes column is formatted with the Normal style. If you wish to export linked URLs or emails, check that all these hyperlinks in the link column are “live”. If they are not either make them live manually of use a macro to do this (see macro B in Appendix 3). Then highlight this column and apply the MM Hyperlink style (see Appendix 2). The table should look something like this (the specific formatting will depend on the template you use):
3. Convert the table to text
This is my simple “new” idea. Tables can be sent directly from Word to MM, especially simple tables like this, but the process isn’t always reliable and it doesn’t take much to throw it out. Converting the table to text arranged as headings and paragraphs seems to provide a much more consistent result.
Highlight the whole table except for the header row. Click on the Table Tools – Layout tab then select Convert to Text in the Data section of the ribbon. When the dialogue box appears, select Separate text with Paragraphs. You should end up with the table contents converted to a set of formatted, usually single-lined paragraphs.
4. Send the converted text to MindManager
Switch back to MM and open the map you wish to send the table contents to (or create the map if you haven’t done so already). Make sure you have chosen a growth layout option that best suits your table. Return to Word, highlight the converted text and press the Send to MindManager button to send it to MM. The resulting map should look like this, with topic notes and hyperlinks displayed correctly:
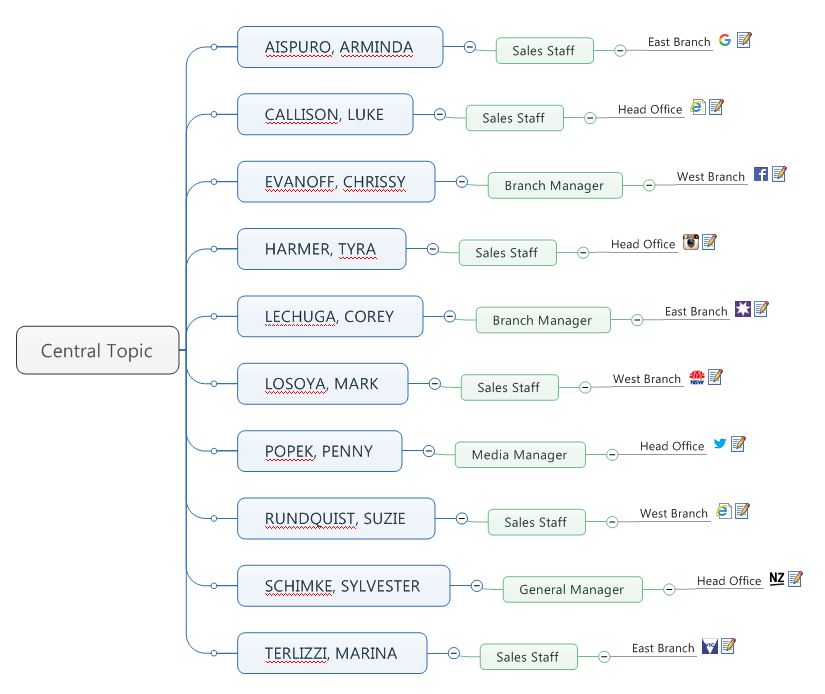
Table Importing 2: hierarchical tables with grouped rows
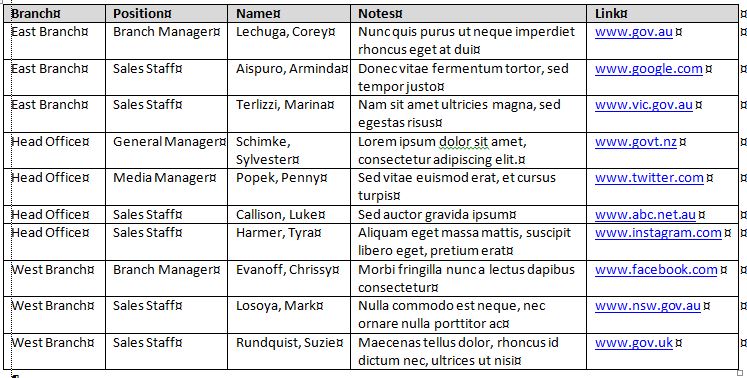
Obviously these tables are going to be more of a challenge. As an example I’ve taken the same hypothetical table I used earlier but changed the column order so that the Branch and Position columns come first. These and the Name columns are also sorted in alphabetical order so that the entries are grouped:
The steps to send a Word table like this to MM are more complex but broadly similar to those for the flat table export:
1. Structure the table correctly
As with the flat table, copy the table to a new blank document created with the template containing the MM paragraph styles (see the preliminary steps section above), then structure the table in a similar way to the example above. The cells in the first column will become the main topics with the cells in the other columns arranged hierarchically underneath.
2. Sort the table and remove duplicate cell contents
This is a key additional step for hierarchical tables. First sort the table based on the initial columns that will form the topic hierarchy; ie, the first column is the basis for the primary sort, the second column for the next sort level, etc. This process should group all identical cells in these columns.
You then need to remove all duplicates in these groups, leaving the first cell in each group. There are several ways to do this; with a small table like this example you can simply do it manually. For larger tables you can search for the duplicated entries and replace with them blanks. For a very large table you might consider exporting it to Excel to use that program’s pivot table feature to remove the duplicates before returning to Word (see Appendix 1).
3. Apply the appropriate Word styles to the table
Then, as with the flat table highlight the first column (Name) and apply the Word Heading 1 style, then apply the Heading 2 and 3 styles to the Position and Branch columns respectively (if the styles have outline numbering you should remove this or use styles without numbering).
Check that the Notes column is formatted with the Normal style. If you wish to export linked URLs or emails, check that all these hyperlinks in the link column are “live”. If they are not either make them live manually or use a macro to do this (see macro B in Appendix 3). Then highlight this column and apply the MM Hyperlink style (see Appendix 2).
In addition you also need to ensure that all the Word Heading style formatting is removed completely from the blank cells from which duplicate text was deleted. You can do this either manually by selecting these cells and applying the Normal style or by running the relevant macro (see macro A in Appendix 3). Formatting the columns first and then removing the formatting specifically from the blank cells may seem a roundabout way of doing things but I think it works better, especially if you use the macro.
The table should look like this (again the actual formatting will depend on the appearance of the styles in the template you are using):

4. Convert the table to text
As I noted with the flat table this is my simple “new” idea, but it is even more relevant to these types of tables as MM can struggle sometime to establish the correct hierarchy and even to import all columns when a table is sent directly from Word without conversion to text.
Highlight the whole table except for the header row. Click on the Table Tools – Layout tab then select Convert to Text in the Data section of the ribbon. When the dialogue box appears, select Separate text with Paragraphs. You should end up with the table contents converted to a set of formatted, usually single-lined paragraphs, like this segment:

5. Send the converted text to MindManager
As with the flat table example, switch back to MM and open the map you wish to send the table contents to (or create the map if you haven’t done so already). Make sure you have chosen a growth layout option that best suits your table. Return to Word, highlight the converted text and press the Send to MindManager button to send it to MM. The resulting map should look like this, with topic notes and hyperlinks displayed correctly (using an org-chart layout):

Table importing 3: Indented outline tables (or Excel pivot tables)
These are more commonly found in spreadsheets (often in the form of pivot tables) but also can be used in Word tables as in the following example fragment:

These tables have the small advantage that you don’t need to format the various fields. You also don’t need to use the Send to MM button or MM import; instead you can simply copy and paste these tables from either Word or Excel to MM. There is one significant downside however. It is not possible to import either notes as topic notes or website URLs and emails as live links. In both cases the fields are imported as topics.
As noted earlier however, Excel’s pivot table feature can also be used to create properly-structured hierarchical tables, as described in Appendix 1.
Comments
Apart from hyperlinks, other specialised fields which can be imported include priority (a single digit number formatted with the MM Priority style), resources/staff codes (MM Resource) and categories (MM Text Marker). In fact most – though not all – task-related fields can be imported this way once MM heading and paragraph styles are imported into the Word. I’ll deal with these in more detail in my next post where I’ll revisit importing tables of tasks, but the following should provide some ideas:


There are some limitations with these approaches but they are relatively minor. It appears you can have only one hyperlink per topic and if you have any merged cells it’s best to unmerge them when structuring the table. Adding comments or hyperlinks to higher level topics is tricky but can be done. I may come back to this in a future post, after my next one on task tables.
Appendix 1: Using Excel pivot tables to assist in importing large data sets
In an earlier post I outlined how to use Excel’s pivot table feature to import large directory-style tables with hierarchical data (in either Excel or Word) into maps which are essentially the indented outline tables discussed in the previous section.
This approach works but I’ve modified it to create a properly-constructed hierarchical indented table with all duplicates removed which can be imported to MM using the second method described above.
1. If the table is in Word, copy and paste it to Excel. Then arrange the columns in descending hierarchical order, left to right. In this example the highest level is branch, followed by section. Then sort the rows in the same hierarchical order.
2. While this method can handle unsorted data, sorting makes it easier to check that the cells to be grouped are identical, which is essential to form the hierarchy required for the map. First ensure that there are no blank cells or inconsistent spacing and then check everything is spelt and punctuated consistently. The table should now look like this in Excel:

3. Highlight the table. In the Insert tab on the ribbon, go to Tables and click on the button to create a pivot table, either on this worksheet or another one, using your table as the source.
4. When the PivoTable Table Field List appears tick all the fields to add to the pivot table as row labels in the order that they appear in the first table. The pivot table should now appear, along with the Pivotable ribbon.
5. Highlight the pivotable, click on PivoTable options on the ribbon and then again on Options. When the PivoTable Options dialogue box appears, click on the Totals and Filters tab and untick the boxes under Grand Totals. The pivotable should look like this:
6. Click on the first entry in the first field (in this case, “East Branch”); the Active Field tab on the PivoTable Tools ribbon should now displaying the relevant field (in this case, “Branch”). Click on Field Settings and when the dialogue box appears, click on the Subtotals and Filters tab and select None under Subtotals. Then go to the Layout and Print tab, select Show item labels in tablular form.
7. Repeat the previous step for the first entry in each of the other fields. The pivotable should now be a table with hierarchical columns with all duplicates removed, which looks like the following. This can be copied to Word where you can then start with step three in the second method outlined in the previous section (Hierarchical tables with grouped rows):
Appendix 2: Importing MM Word styles
The method for importing MM’s version of Word styles was discussed in the first part in this series. Basically it involves exporting a topic or task from MM to Word to ensure these styles are available for use in Word.
Unless you are importing tables of tasks (which I’ll revisit in the next part of this series) the only style you really need is the MM Hyperlink style, but as I suggest in that post it’s useful to look at importing all the MM styles – there is only a little extra work involved and it means that you have the styles available for use in importing tasks (more on that in a separate post) or the other features I mentioned in the Comments earlier.
This is of course assuming you want to import website URLs and/or email addresses as live links or the other specialised fields; if not, you can skip this step entirely.
Appendix 3: Installing macros to help with table formatting:
A. Macro to remove formatting from blank cells
One important task particularly when importing hierarchical tables is that you need to clear all formatting from blank cells in the table, especially in the initial columns where the cells which contain text will form the main topics and primary subtopics.
This can be done manually but the following macro (which as I’m a lousy macro writer I have “borrowed” and modified) will speed up this process. Please note that the cells must be genuinely completely empty for this to work and that running this macro will clear the formatting from all empty cells in all tables in the document.
Sub ClearCells()
Dim i As Long, j As Long, k As Long
With ActiveDocument
For i = 1 To .Tables.Count
With .Tables(i)
For j = 1 To .Rows.Count
With .Rows(j)
For k = 1 To .Cells.Count
With .Cells(k)
If Len(.Range) < 3 Then
.Select
Selection.ClearFormatting
End If
End With
Next k
End With
Next j
End With
Next i
End With
End Sub
B. Macro to make hyperlinks “live”
This is another macro I borrowed and modified to simplify another aspect of the importing process. If you wish to import hyperlinks and show them as icons on the topics to which they are attached they need not only to have the MM hyperlink style applied but before that to be made “live” as hyperlinks in Word.
This usually happens automatically when the hyperlink is immediately followed by a space or paragraph return, especially in normal text. Depending on the formatting applied the hyperlink will change colour or be underlined to show that it is live.
In a table however it is possible for hyperlinks not to be activated in this way, especially if they are imported to Word from another source. As with the removal of formatting from blank cells this can be done manually, but adding a space or paragraph return to every hyperlink in a table with a lot of entries is both boring and time consuming.
Please note also that this macro will make all hyperlinks in the document live whether or not they are in the table you are sending to MM.
Sub URL2Hyperlink()
Dim f1 As Boolean, f2 As Boolean, f3 As Boolean
Dim f4 As Boolean, f5 As Boolean, f6 As Boolean
Dim f7 As Boolean, f8 As Boolean, f9 As Boolean
Dim f10 As Boolean
With Options
‘ Save current AutoFormat settings
f1 = .AutoFormatApplyHeadings
f2 = .AutoFormatApplyLists
f3 = .AutoFormatApplyBulletedLists
f4 = .AutoFormatApplyOtherParas
f5 = .AutoFormatReplaceQuotes
f6 = .AutoFormatReplaceSymbols
f7 = .AutoFormatReplaceOrdinals
f8 = .AutoFormatReplaceFractions
f9 = .AutoFormatReplacePlainTextEmphasis
f10 = .AutoFormatReplaceHyperlinks
‘ Only convert URLs
.AutoFormatApplyHeadings = False
.AutoFormatApplyLists = False
.AutoFormatApplyBulletedLists = False
.AutoFormatApplyOtherParas = False
.AutoFormatReplaceQuotes = False
.AutoFormatReplaceSymbols = False
.AutoFormatReplaceOrdinals = False
.AutoFormatReplaceFractions = False
.AutoFormatReplacePlainTextEmphasis = False
.AutoFormatReplaceHyperlinks = True
‘ Perform AutoFormat
ActiveDocument.Content.AutoFormat
‘ Restore original AutoFormat settings
.AutoFormatApplyHeadings = f1
.AutoFormatApplyLists = f2
.AutoFormatApplyBulletedLists = f3
.AutoFormatApplyOtherParas = f4
.AutoFormatReplaceQuotes = f5
.AutoFormatReplaceSymbols = f6
.AutoFormatReplaceOrdinals = f7
.AutoFormatReplaceFractions = f8
.AutoFormatReplacePlainTextEmphasis = f9
.AutoFormatReplaceHyperlinks = f10
End With

Pingback: The Ins and Outs of MindManager Word Importing – Part C: Task Lists | Sociamind
Pingback: Sending tasks from Word to MindManager (with a little help from Excel) | Sociamind
Pingback: How to create maps in MindManager from directory-style tables | Sociamind
Pingback: MindManager 2017’s new features in action – 3: researching with reusable tags (part 2) | Sociamind
Pingback: MindManager Gaps and Tricks 2: Importing a list of websites | Sociamind