
Update: I have published an updated and simplified method for importing task lists from Word which does not rely on splitting the table into rows as described in the post below. This is Part C of a series of articles on importing from Word and should be read in conjunction with Part B which covers importing non-task tables. Part A looks at the importing of standard non-table text from Word.
1. Introduction
Recently I posted a series of three articles that discussed how to use MindManager’s Gantt table to export a user-friendly to-do list with task data from MindManager to either Excel or Word, noting that despite its numerous export options the program lacked a facility to produce such a simple list easily (yes, exporting to Excel does produce a list but if you have a multi-layered map the tasks will spread across several columns which is difficult to read and time-consuming to turn into something more user-friendly).
The opposite – importing a task list complete with this task information created in either these programs direct into MindManager (MM) – is even more difficult. While MM will happily import a Word document with the appropriate heading structure or (albeit a bit more grudgingly) a table, in both cases it either ignores the task information or imports it rather uselessly as sub-topics or topic notes.
Importing from an Excel spreadsheet is even more problematic. I have described in an earlier post how this can be done directly using a Pivottable but again any attached task information is either ignored or imported as sub-topics. You can import a table with task information from Excel into Outlook and from there sync these tasks with MM while preserving task information but there are a few steps involved as well as a few limitations. In any case lots of people don’t have Outlook and those that do don’t necessarily want to use it to sync with MM, especially if they want to do a one-off transfer from another mind mapping program which can write a Word or Excel table but can’t export directly to MM.
There are some add-ins that can import from Excel directly but these seem to come and go. The only one that I am aware of that currently works with MM 16 is the aHa!XLS add-in which costs €69. Other more expensive alternatives include importing tasks from MS Project (incidentally Andrew Wilcox has a post on the Cabre website with an excellent map summarising the many options and add-ins available for using MM as a task management tool) but for the purposes of this post I was interested in scenarios where a user might not have access to either add-ins or Project but instead wants to import a task list generated in Word, Excel or another third-party program that can export to either of these formats.
There has always been one indication that importing tasks from Word complete with task information directly into MM should be possible, at least in theory. This is the way in which MM exports to Word; it’s not immediately obvious but it doesn’t use the Word formatting styles in the resulting document, instead creating its own versions based on the Word template being used.
Usually this is a cause for annoyance, especially as MM’s heading usually styles look identical to the Word ones they are based on but are not integrated, so for example you can end up with two numbering systems in the same document. For this reason I’ve always advised people to use the WordX add-in rather than MM’s built-in export, or if they must use MM’s facility to consider converting the styles in the imported document back to their Word counterparts.
It also turns out that MM converts not only the Word heading styles but also creates quite a few new styles of its own, most of which are specifically applied to exported task information. For example, the process creates separate MM styles for start and due date, priority, resources etc (see following example style list). Why MM needs to do this is a bit of mystery, but it does raises the prospect that you can use these styles to send tasks and task information the other way.

Word style list showing MindManager styles
This was my original hypothesis. In fact, sending back a single task proved to be easier than I thought but transferring a list of multiple tasks was a bit more difficult and required overcoming a couple of major obstacles. I have developed some work-arounds to do this but there are a few steps involved; people will have to decide for themselves if this approach is easier to use then the more conventional methods I mentioned earlier.
2. Background to the process
Before describing the actual process it’s useful to look at a typical task and how it looks after it is exported from MM to Word. I’ve set up a hypothetical task with just basic task information: a priority and percent completion, start and due dates, duration and a resource, as follows: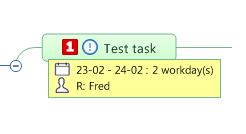
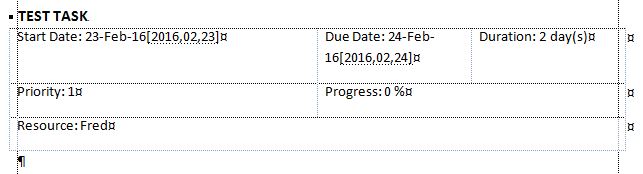
This is the same task after it has been sent to Word. The task itself has been made into a Word heading but the actual task information is contained in a table underneath. What you can’t see are the special Word styles that MM has applied to the heading and each cell, which I’ve added in italics in the second image:

The key test was whether sending this task back the other way from Word to MM was possible – and indeed it is. The following shows the result in MM – a task virtually identical to the original, the only discernible difference being the capitalisation of the task name (which reflects the capitalisation of the style applied in the Word document).

Highlighting two or more such tasks in Word and sending them to MM also works, which raises the possibility of being able to send a list of tasks. The problem however is that MM’s exported Word task format is a mini-table itself and consequently does not lend itself easily to being incorporated in a larger list. I therefore decided to see if it is possible to condense the table, including the task title, into a single row. This involved experimenting with what you can take out – and what you have to leave in.
3. Slicing and dicing the task table
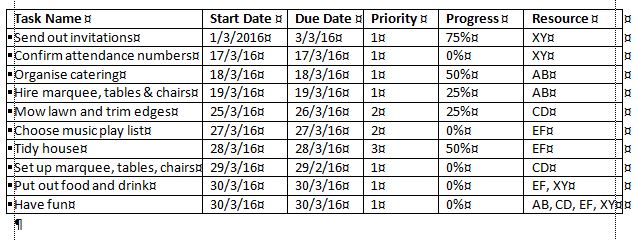
Starting by removing the extraneous text and moving the cells around while maintaining the MM style formatting, I was able to come up with a table structure which incorporates the basic parameters and condenses them to a single row for each task. This structure could be applied to any standard table of tasks, for example the following:
There are some specific parameters for some elements of the task information:
- Task Name: this can be any combination of numbers and letters
- Priority: needs to be an integer between 1 to 9
- Percent complete: needs to be a whole number between 1 and 100 (with or without the % symbol)
- Start Date and Due Date: the dates need to be in a very specific format – year,month,day, separated by commas and surrounded by square brackets: [yyyy,mm,dd]. For example, 10th August 2016 has to be written as [2016,08,10] (in fact MM can cope with dates written in [yy,m,d] format, for example [16,8,10], but because of the potential for confusion it is safer to stick with the longer date form).
- Resource: can be any combination of letters and numbers.
You may have noticed that one item of task information is missing – Duration. While MM does generate a Duration style, the duration itself turns out to be redundant for importing purposes. As long as both the start and due dates are provided, MM is capable of calculating duration on the fly as the table is imported but not vice versa. If only one date and the duration are supplied MM does not seem to be able to do the same trick in reverse; ie, it is unable to calculate the missing date and both it and the duration are not shown.
As I mentioned earlier there are some obstacles that need to be dealt with before the table can be sent to MM. I’ll provide a brief overview of what needs to be done first and then provide some detailed steps in the next section:
- Date formatting: Unless you want to add or edit the dates manually the best way to deal with this is to send the table to Excel to use that program’s date handling abilities and then return it to Word, as described in the next section.
- Applying the MM task styles: It advisable to do this back in Word after sorting out the date formatting. Each column should be highlighted and the appropriate style applied.
- Splitting the table into rows: Unfortunately even when tasks are organised into single rows, MM expects each individual task row to be separated by a paragraph return between the rows. So if for example the table has ten rows, these need to be separated into what are effectively ten single-row tables.
I tried numerous ways around this but MM needs a return outside the task row to signal a record break. I found the best option to add these was to use a Word macro. I’m not terrific at writing macros but fortunately I found one online at the Experts Exchange site which does the trick after a slight modification (see next section). The cursor must be placed within the table for the macro to run properly otherwise you will get an error message.
Once these tasks have been completed the table should look like this. Using the steps described in section 4 it can now be highlighted and sent to MM (without the header row):

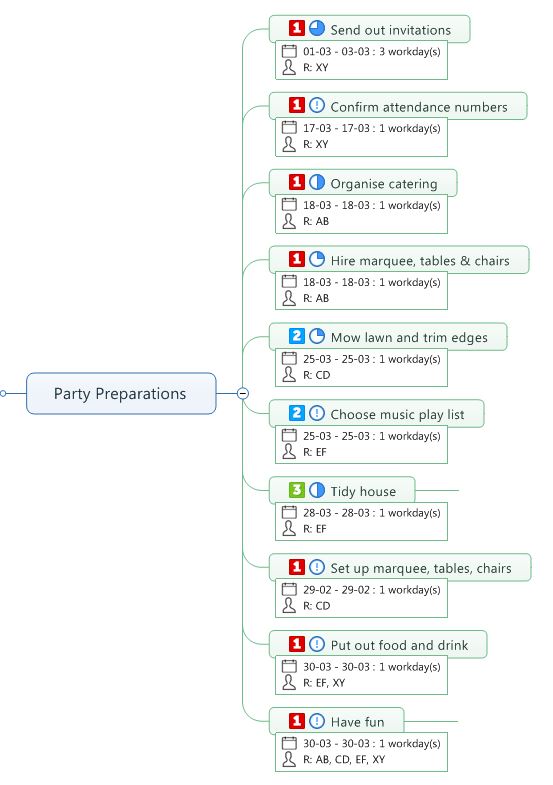
Resulting in a set of MM task topics like this:
4. A two-part process
Putting it all together I’ve come up with the following two-stage process. MS Word is required and Excel is strongly recommended (along of course with MM 16 for Windows or another recent version). You also need a reasonable degree of familiarity with these three programs and in relation to Word a basic knowledge of Word styles, templates and how to install and use macros. While this may all seem complicated, the first stage only needs to be done once.
Stage 1 (needs to be completed only once)
1. Create a dummy task in MM with data in all the following fields: Priority, % Completed (make zero if not started), Start Date, Due Date, Resource.
2. Send the task to the Word and save to the relevant Word template.
3. In Word, create a new macro and copy the following into it:
Sub SplitTabletoRows
‘
‘Split the current table into individual rows
‘
Set Tbl = Selection.Tables(1)
For Idx = Tbl.Rows.Count To 2 Step -1
Tbl.Cell(Idx, 1).Range.Select
Selection.SplitTable
Next
With ActiveDocument.Content.Find
.ClearFormatting
.Replacement.ClearFormatting
.Text = Chr(13) & Chr(12) & Chr(13)
.Replacement.Text = Chr(12)
.Forward = True
.Format = False
.Execute Replace:=wdReplaceAll
End With
End Sub
4. Create a test table in a Word document based on the template and check that you can see all the MM styles imported in step 1, then place the cursor in the table and check that the macro installed in step 3 runs properly.
Stage 2 (needs to be completed in every time you import a list)
1. Check that the task list is laid out as a table in either Word or Excel, with the information in the following columns: Task Name, Priority, Percent Complete, Start Date, Due Date and Resource (if applicable). The Start and Due Date columns can be in any common date format.
2. Send the table to Excel (if your list is already in Excel just skip this step).
3. Use Excel to apply MM-compatible date formatting to your list:
- Create two new columns, for start and end dates, next to the existing ones.
- Highlight the top cell in the new column next to the Start Date column, then go to the Number tab on the Home ribbon and then under Format Cells choose Custom. Copy the following date format into the Type field: “[“yyyy,mm,dd”]”and press OK.
- In the same cell that you have just modified, type the following formula “=B2”, where B2 is the corresponding cell in the existing start date column. Copy this formatted cell down the column to create what is a new Start Date column.
- Repeat these steps with the top cell in the new column next to the Due Date column and copy down the column to create the new Due Date column.
- If the dates appear correctly, highlight the new Start Date column, then select copy and then from Paste Special select “paste values” and paste the column back over itself (this removes the link to the existing column). Repeat this for the new Due date column
- Delete the original Start and Due Date columns.
4. Copy the modified table and paste it back into a Word document.
5. In Word, highlight the task name column and apply either a MM heading style or a Word heading style.
6. Highlight each of the remaining columns and apply the appropriate MM style formatting (imported in stage 1).
7. Click in the table and run the split table macro (also installed in Stage 1). The table should be separated into single-row tables separated by paragraph returns (remember that unless the cursor is in a table you will get an error message).
8. Highlight the separated rows and paragraph returns (apart from the header row but including the paragraph return under the final row) and send them to the relevant parent topic an existing or new MM mind map. They should now appear as tasks with all the appropriate task information.
5. Additional options and comments
The instructions above are based on a task list with basic task information. The following can be added to the task list assuming the appropriate style formats have been ported across from MM:
- Tags: these can be created in a cell in the task row and if the appropriate formatting is applied will be written back to MM as text tags. They do not appear in the General tags group in the Index pane in MM however and are instead consigned to an unnamed group.
- Task or topic notes: this field differs to the others in that the text must be placed below and not within the table. Multiple formatted paragraphs can be included along with hyperlinks and the formatting will be retained in the topic notes. An extra return should be placed below the final paragraph of each comment. Incorporating these steps in the process described above is problematic however. If you have only a few tasks with additional notes it may be simplest to run the process as described but then add the notes manually before the table is sent to MM.
- Document headings: if these have been formatted with either the default Word heading styles or the imported MM ones these will also transfer but if you are going to use them then each table(s) under each heading will have to be prepared separately.
The following fields do not appear when sent to MM, or fail to appear correctly: Duration (as noted earlier this is redundant), Effort, Hyperlinks (except for those within comments), Callouts and Review Comments.
There you have it. I’m not sure if this really is simpler than of the other methods already available (or if it is worth the effort not to pay for an add-in) but it is relatively straight-forward to run once you have completed the one-off stage one. I’d welcome any feedback especially if you found this approach to be useful or if you have any tips or suggestions.

Pingback: The Ins and Outs of MindManager Word Importing – Part C: Task Lists | Sociamind