This is the third in a series about importing Word documents into MindManager (MM), relying in part on the program’s ability to recognise its own Word formatting to recognise specialised fields. In the first part I covered how to import paragraph-based documents while using the heading structure to generate the topic hierarchy of the resulting mind map, while in part B I discussed table and spreadsheet importing from Word and Excel. In this part I’m applying on some of the techniques to import a more specialised table type – task lists.
Some people might have noticed that I discussed this in a previous post a little while ago. I’m revisiting this topic partly because I was asked to post a simpler version of that article but also because I have simplified the technique based on my experiences with non-task-related tables. The most important aspect has been my “discovery” as outlined in part B of this series that converting a table in Word to text arranged as headings and paragraphs prior to importing seems to provide more consistent results than importing directly.
The instructions outlined below are based on those I describe in the previous post. I’ll be relying on some of the techniques outlined in the appendices in part B so it’s therefore a good idea to read this post first. In particular you will need to have imported all of MindManager’s Word styles into Word (see part B of Appendix 2) and set up a template incorporating these styles. You will also need to have installed the Word macro to remove formatting from blank cells (part A of Appendix 3). If you have hyperlinks it’s also a good idea to install the macro to ensure that all the hyperlinks are “live” before the table is imported from Word (part B of Appendix 3).
In addition you will definitely need Excel as well as Word. I’m using MM version 16 and Word and Excel 2010, but these techniques should work with all recent versions of MM and Word/Excel (though I can’t guarantee this). This approach should also work with tables exported to Word or Excel from other programs; this is very useful for importing from task management and mindmapping programs which can’t talk to MM directly.
I’m starting off with a hypothetical task list for “Anne” and “James” who are throwing a party. Anne, being a methodical soul, has arranged the tasks as a hierarchical grouped table with columns for tasks, task priority, progress (shown as percentages), start and due dates and resources. She’s assigned a category to some tasks and also added few comments as shown in the table:
 1. Structure the table correctly
Copy the table to a new blank document created with the template containing the MM paragraph styles (see my earlier comment), then structure the table in a similar way to the example above. The cells in the first column will become the main topics with the first level of subtopics forming the second column and so on. As long as the sequence of these columns reflects the task hierarchy correctly and they come before the task-related columns, it seems that the latter can be arranged in any order.
2. Sort the table and remove duplicate cell contents
First sort the table based on the initial columns that will form the topic hierarchy; ie, the first column is the basis for the primary sort, the second column for the next sort level, etc. This process should group all identical cells in these columns.
You then need to remove all duplicates in these groups, leaving the entry first cell in each group. There are several ways to do this; with a small table like this example you can simply do it manually. For larger tables you can search for the duplicated entries and replace with them blanks. For a very large table you might consider using Excel’s pivot table feature to remove the duplicates before returning to Word (see Appendix 1 in the previous post) – especially as you will need to export the table to Excel anyway (see the next step).
3. Copy the table to Excel and format the date columns
The main reason you have to involve Excel in the task import process is because MM uses a very specific internal date format involving the use of square brackets – and while it never displays dates this way it seems that any imported dates have to be formatted the same way to be recognised.
This is difficult to create in Word but is fairly straight-forward to do in Excel. First, copy the table and paste it in an empty Excel spreadsheet, where it will look something like this if you didn’t remove the duplicates in step 2 (the specific formatting of the date columns doesn’t matter too much at this stage, so long as Excel can recognise the entries as dates).

Now highlight the two date columns. Click on the drop-down field in the Numbers tab on the Home ribbon, select More Number Formats from the drop-down list and then select Custom in the resulting dialogue box. In the Type field enter the following (including all the quotation marks):
“[“yyyy,mm,dd”]”
As a result the dates should be converted to look like this: [2016,05,07] and the table should look something like the following:

As I noted in the first step, at this point you can also use Excel’s pivot table feature to remove the duplicates before returning to Word (see Appendix 1), in which case the resulting table will look like this:

Note: There are a couple of problems with using the pivot table feature to strip out duplicate cells. The first is that the text “(blank)” is inserted in some of the blank cells; this can be removed easily enough in Word. The second is that the table is sorted alphabetically starting with the first column; this has to be fixed by sorting manually in the table in Word or by rearranging topics in the map after the table is imported to MM.
4. Apply the appropriate Word styles to the table
With the exception of the Comments column which should be formatted with the Normal style, the rest of the columns are formatted with the MM styles imported from Word. If they have been installed correctly on the template you’re using the Word Styles list should look something like this:
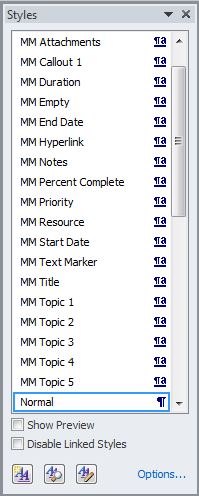
The following table summarises how the inbuilt Word and the MM Word Styles from this list should be applied, based on the column labels used in this table:
Heading Style to use
- Type Heading 1 (or MM Topic 1)
- Task Heading 2 (or MM Topic 2)
- Sub-Task Heading 3 (or MM Topic 3)*
- Priority MM Priority
- Progress MM Percent Complete
- Start MM Start Date
- Due MM End Date
- Resource MM Resource
- Category MM Text Marker
- Comments Normal
- Hyperlink MM Hyperlink**
* You can go down to five levels of heading
** The hyperlinks should be made “live” first
In addition you also need to ensure that all the Word Heading style formatting is removed completely from all the blank cells in which duplicate text was deleted. You can do this either manually by selecting these cells and applying the Normal style or by running the macro I supplied in Part B (see macro A in Appendix 3). Formatting the columns first and then removing the formatting specifically from the blank cells may seem a roundabout way of doing things but I think it works better, especially if you use the macro.
The table should now look like this (again the actual formatting will depend on the appearance of the styles in the template you are using):

5. Convert the table to text
As I said earlier this is the additional step which seems to make the process more reliable. As I noted in the previous post on importing non-task tables, MM finds it difficult to establish the correct hierarchy and even to import all columns when a table is sent directly from Word without conversion to text.
The problem is even more acute for task tables as there appears to be an issue with establishing the end of each task without a paragraph return. In my previous post I split the table into individual single-row mini-tables separated by a paragraph return but turning the table into text is a much simpler as Word automatically inserts the returns at the end of each item.
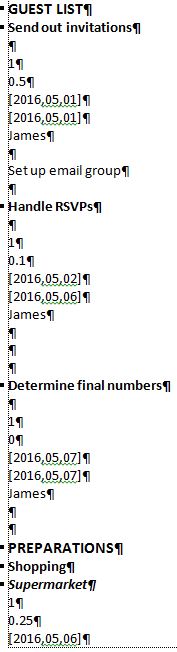
Highlight the whole table except for the header row. Click on the Table Tools – Layout tab then select Convert to Text in the Data section of the ribbon. When the dialogue box appears, select Separate text with Paragraphs. You should end up with the table contents converted to a set of formatted, usually single-lined paragraphs, like this segment:
6. Send the converted text to MindManager
As with the flat table example, switch back to MM and open the map you wish to send the table contents to (or create the map if you haven’t done so already). Make sure you have chosen a growth layout option that best suits your table.
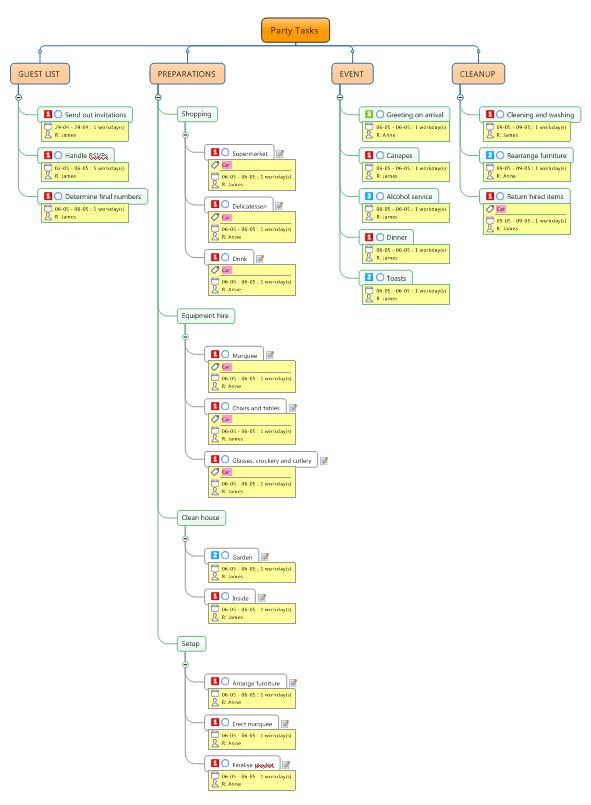
Return to Word, highlight the converted text and press the Send to MindManager button to send it to MM. The resulting map should look like this, with all task information displayed correctly using an org-chart layout(I’ve shown this without task roll-up but this can be applied):
7. Comments
As I noted in the previous post on importing task lists, there specific parameters for some elements of the task information:
- Task Name: this can be any combination of numbers and letters.
- Priority: needs to be an integer between 1 to 9.
- Percent complete: needs to be a whole number between 1 and 100 (with or without the % symbol).
- Start Date and Due(End) Date: as discussed above, needs to be in the format [yyyy,mm,dd].
- Resource: can be any combination of letters and numbers.
One element which is missing is duration, which turns out to be redundant for importing purposes. As long as both the start and due dates are provided, MM is capable of calculating duration on the fly as the table is imported (but not vice versa).

Nicely done – Thank you.
LikeLike
Pingback: Sending tasks from Word to MindManager (with a little help from Excel) | Sociamind
Pingback: How to create maps in MindManager from directory-style tables | Sociamind