
One of the lesser-known features added in MindManager (MM) 2017 is the ability to reuse the same tags in different tag groups. As the MM 2017 help file notes:
Earlier versions of MindManager limited tags to be unique across all of a map’s tag groups. For instance, it was impossible to include the tag “High” in multiple tag groups. In MindManager 2017, it’s now possible to add the same tag name in multiple tag groups. For example, you can use tags like “Low,” “Medium” and “High,” across Tag Groups like Opportunity, Risk, Reward, or Strategic Fit, to categorize your topics.
This might seem like a minor enhancement but it has significant benefits for people like me who use MM for research purposes. I often undertake case studies focussing on the operations of range of organisations. These studies involve interviews, structured discussions or surveys with a range of key staff and external stakeholders and so usually result in a mix of quantitative and qualitative data across a range of issues.
In the first part of this series I’ll look at how I use MM for research and in particular how I apply tags. I’ll also describe the benefits of reusable tags and provide some advice on how to copy tag sets. Although I’m concentrating on MM in research practice, these techniques may be helpful in other areas, especially if you are interested in making major use of tags.
Using MindManager for research
Before I discuss the benefits of reusable tags let me explain briefly why I use MM to manage interview and survey material, a process I started long before the appearance of MM 2017 (and reusable tags). Often I need to analyse it in a number of ways, for example comparing responses between individual respondents within a single organisation or across all those being studied. Alternatively, I may need to group and compare the responses of different types of organisations.
While there is a wide range of specialised analytical tools available for this work, most of these are overkill for the small data sets I am studying which usually involve a maximum of around a dozen respondents. Up to this number MM provides a simpler approach; it may be an unconventional use for mind mapping software, but it does draw on a number of the program’s unique strengths.
For example, MM offers the ability to store and present material in an accessible way, to classify and code it easily and then to filter and extract information. MM’s visual approach assists in recording responses and can also reveal patterns in the data that might not be so easy to find using more conventional techniques.
Methodology…
There isn’t enough space to provide a detailed description of my approach – especially as I vary it slightly to suit the needs of each project – but the following is a quick summary. I start by creating a map of the survey with separate map topics for each question. I then copy the list of interviewees or survey respondents (usually with coded names) and paste this as a group attached to a Responses topic so there is a sub-topic for each respondent. This is saved as a map part to be added to each question in the map. Alternatively I create a text tag for each respondent to be applied to their responses or just add a code at the beginning of each response.
I then start entering the responses to the first question and repeat the process for the other questions. One of the advantages of using a map is that if I am transcribing the responses directly from interview recordings I can move quickly between different questions on the map to record the relevant bits of the answer if the person didn’t “stick to the script” when responding. This applies especially if the interview is a structured conversation rather than a straight Q and A session.
How I record the material depends on the nature of the survey and the responses. For longer answers the easiest option at first glance is to use topic notes, but this makes the material a little less visible. My preference is to divide longer replies into a series of sub-topics, with each sub-topic either paraphrasing a single idea or containing a single paragraph from the full answer. This makes the responses more accessible, but if there is too much text or I need a full transcript for other purposes I might summarise the main points as sub-topics and transcribe the detail into the associated topic notes. I’ll return to the issue of data entry in Part 2.
… and the benefits of tagging along
When I began using maps for this purpose I quickly realised that as well as identifying respondents tags could provide a simple way to categorise this material. I create a separate tag group for each question; in some cases such as multiple choice questions, I can define these in advance (for example, “High”, “Medium” or “Low”), while others are developed iteratively. As I start to read through the answers to each question, common patterns or themes emerge from which I can create the initial tag system. I refine this further as I read additional responses. Obviously there will be questions for which the range of categories will be identical or very similar.
Most answers are likely to require several tags though breaking up each response means that each resulting sub-topic can usually be categorised using just one or two tags. Sometimes however the opposite is true; a single response may provide answers to more than one question, though in these situations there is nothing to prevent tags from more than one tag set being applied.
When the process is complete the marker index provides a handy summary of the number of topics related to each tag or category for that question, as well as short-cut to review related topics. This makes it easy to spot patterns in the answers and their relationships to other characteristics.
Breaking the unique tag hoodoo with MindManager 2017
Prior to the current version there was a fundamental problem with using MM as the basis for this approach – it was impossible to use the same tag in different tag groups. Even if the responses were similar, each tag had to be unique. This meant that individual tag groups had to be created from scratch for each question even if the values were the same, so you could end up with groups like “Q1 High” “Q1 Medium, “Q1 Low” and “Q2 High”, “Q2 Medium, “Q2 Low”, etc.
The advent of reusable tags in MM 2017 has now removed this arcane restriction. You can now reuse the same set of tags with multiple questions, for example (as noted in the MM 2017 help file quoted earlier) “High”, “Medium” and “Low. This makes life a lot easier, especially if you have a large number of questions with the same answer sets.
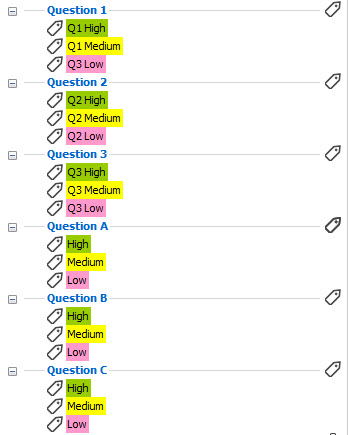
The old and the new: examples of how tag group design had to be approached with non-reusable tags (questions 1-3) and – from MindManager 2017 onwards – how reusable tags can be used (questions A-C)
There is one remaining hurdle; copying tags. Individual tags can’t be copied and while it is possible to copy a tag set, it is still difficult to paste it into a Map Index of the same map because MM won’t let you have two sets in the one Index with the same name. The following instructions provide a workaround, and of course assume you are using MM 2017:
- In the Map Index, create a new tag group with a name like “Default Tags” and within this create the standard set of tags you want to use. If you intend to also use the same colour for tags with the same name in each tag group, add these colours as you create the tags (tag colours are retained using this method).
- Right click on the name of this tag group and then copy it.
- Right click again on the same tag group name and then rename it with the name you want to use for the first marker set; for example, if you want to categorise responses to the first question in a survey all you may need to do is rename the group as “Q1”.
- Click on the green Plus symbol at the top of the Map Index and then click on Paste Marker Group. The copied group should appear in the Map Index with its original name.
- Repeat step 3 to rename the group, choosing the name you want to use for the second tag group, for example “Q2”.
- Repeat the copying, pasting and renaming process for each tag group when you want to set up. When you have created all the tag groups you require, paste the group one more time in the index but leave the original name (“Default Tags” or whatever you chose). This will allow you to repeat the process if you subsequently discover you need another set of tags.
- After all the tag groups you require are created, go back and make any modifications you require to specific sets (I suggest you do this at the end of the process to avoid losing track of the copied group as you create the marker sets).
A simpler approach with the MAP add-in
Olympic Limited’s excellent MAP MM add-in provides a much simpler alternative. As I have noted before, MAP is a bit of a Swiss army knife, providing over additional 50 features for MM, including a function to convert sub-topics to markers. The following approach relies on this feature and assumes you have MAP installed as well as MM 2017:
- Create a topic with the name of the first tag group you want to create and add a sub-topic for each tag you want to create within this group.
- With the parent topic highlighted, go to the MAP task pane and click on the Sub-Topics to Markers icon (or do the same in the MAP Topic Actions section of the MAP ribbon, if you have added the command there). The sub-topics should be added as tags in the Map Index in a tag group with the same name as the parent topic.
- Change the name of the parent topic to that of the second tag group you want to set up and repeat step 2.
- When you have created all the required tag groups, you can retain the tag group in the map for future use with the parent topic changed to a name like “Default Tags”. Alternatively, you can change the name and copy the group to the Map Index before deleting it in the map.
Apart from its simplicity this approach offers a couple of advantages and one disadvantage. On the plus side, you don’t have to remember whether you have a copied tag group to manage, so you can edit the tag groups as you create them. In addition, you can combine the techniques; for example, if you have already established a tag group based on your analysis of responses to the first question in a survey, you can copy this group and paste it in the map, where it will appear with the tag group name as the parent topic and the individual tags as sub-topics. Once in the map you can use the instructions outlined above to create additional tag groups.
The one disadvantage of using the MAP add-in feature is that unlike the standard method it is not possible to establish and copy default tag colours; these have to be added to each group separately. This applies even if you copy a tag group which has tag colours into the map for future copying; unfortunately, the colours are lost when the group is pasted into the map.
In Part 2 I’ll discuss different data entry techniques and research approaches you can use with MindManager in analysing interviews and surveys, as well as some of the limitations with MM as a research tool.

Pingback: MindManager 2017’s new features in action – 3: researching with reusable tags (part 1) sociamind.com/2017/07/18/min… pic.twitter.com/Mah8pGT3uK – tags
Pingback: MindManager 2017’s new features in action – 3: researching with reusable tags (part 2) | Sociamind
Pingback: MindManager – “reverse mapping” and exporting the MAP Index | Sociamind