
Do you use MindManager, and have you always wanted to have one map to rule all the other ones? This series of posts outlines an approach that can be used to provide such a map, or at least one that would give you the opportunity to review other maps and make minor changes to them.
Recently Andrew Wilcox posted a great MindManager map on his Cabre Applications of MindManager blog which provides a comprehensive overview the many ways in which MindManager (MM) can be used to manage tasks. As he states and as the map demonstrates, MM offers “so many options and add ins” to achieve this as a stand-alone program as well as in combination with other members of the Mindjet “family” or in conjunction with external programs including Microsoft Outlook.
One option that MM does lack is the capacity to set up a single dashboard map that can give you a snapshot of progress across all your projects, an issue that’s caused some lively debate recently on the Mindjet forum. This is because MM does not have an internal database of tasks from which such a dashboard could be created and in the absence of such a beast, MM’s file structure makes it difficult for a mindmap to be used to survey status across other maps.
The most obvious alternative is to use an add-in like ResultsManager, from Gyronix, which provides such a database, but while this is a very powerful tool it is fairly expensive and may be overkill for many users. There is another way, however, which is free if you already have a copy of Outlook; this is to exploit MindManager’s capacity to synchronise tasks (and other items) between the two programs. In effect, Outlook tasks are used to form a database of MM tasks.
Here’s the first stage of a process I have developed that will allow you to do this. Not only that, once the dashboard map is created you can also use it to update progress in the individual project maps without touching Outlook (though you can certainly use Outlook to do this as well).
This approach probably isn’t suitable for MM users who are complete novices, but while it is a little fiddly it really isn’t all that difficult. As well as a copy of the PC desktop version of MM from version 9.2 onwards you will need Outlook 2007 onwards and to have established that these programs can talk to each other. If you are not a regular user of Outlook you should have a play with it as well, particularly with Outlook tasks and the process to assign specific categories to them, but as I said you don’t need to interact with Outlook once the maps are set up (provided MM can talk to it).
In stage 1 I’ll outline how to link your MindManager project maps with Outlook and in particular how to apply Outlook categories to the tasks in these maps. I’m using MM15 and Outlook 2010, but the steps are similar in any recent version of both programs:
- Create your project maps in MindManager incorporating all the tasks involved. You should know how to do this; make sure that all tasks you create have been given start and due dates, a priority level and the progress symbol is set to 0% (or whatever proportion has been completed to date).
- Work out a system of categories – but don’t apply them to the tasks in your maps just yet. For various reasons – mainly the change in the method of syncing tasks between MM and Outlook introduced in version 9 of MM – categories first created in MM are simply not recognised in Outlook. You can sync tasks either way between the programs, but for categories to be recognised at both ends and kept in sync they must be first created in Outlook and then sent to MM.
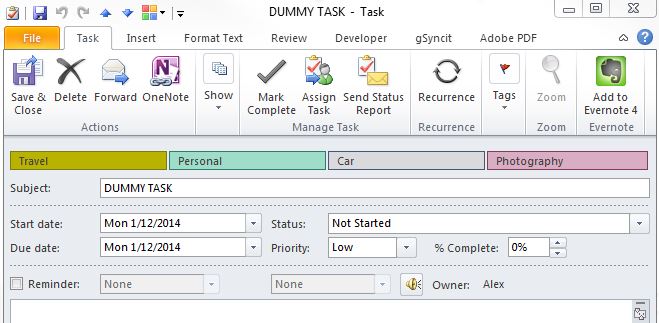
- Set up a dummy task in Outlook as a basis for assigning categories and category colours. In Outlook create a dummy task with an obvious name and a date that’s well outside the likely date range of your actual project tasks. The purpose of this dummy task is to act as a transport so that the categories can be imported into each MM project planning map from Outlook. Then click on the categorise button under the Home tab on the ribbon and add your list of categories, assigning colours to them as you go. The resulting list of category tags should contain all the categories you want to use across all your maps. How to approach categorisation is up to you, but for the rest of this guide I’ll assume you are setting up categories and colours based on projects or sub-projects.

Dummy task created in Outlook to transfer categories to MindManager
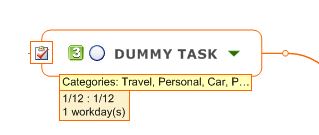
- Send the dummy task(s) to the relevant MindManager map(s). Open up the project planning map in MM and click on either the central or main topic. Return to Outlook, select the dummy topic and click on the Send to MindManager button. If this process is successful the dummy topic should appear in the map, along with each of the categories listed under a separate “Categories” tag group in MM, which is available on the Map Index tab. You may have to sync the dummy task again for this to occur, but once the Categories list appears this task’s work is done and you can delete it from the map (but retain a copy in Outlook in case you need to repeat the process). You can sort the Categories group in MM but don’t change the name of the group. If you want you can repeat this process with several dummy tasks each specific to a particular map and assigned a subset of the categories relevant to the specific map.

Dummy task as it appears in MindManager

Categories tag group in MindManager
- Send the MM tasks to Outlook from each map before you assign categories to them. You can send each task individually or as a group; if the process has been successful each task should now have an icon in your map indicating it is now a “Microsoft Outlook Task” and of course it should appear in the task window in Outlook. It would seem logical to apply the categories before doing this but resist the temptation, as they still won’t be recognised in Outlook until the next step is completed.
- After the task topics have been sent to Outlook, assign categories to tasks from the Categories text tag group in each map and then resync with Outlook. Both assigning category tags and syncing can be done either individually with each task or with a group – again, you may have to sync twice. Once this is done the tasks in your project maps should be identical to their counterparts in Outlook, with the same colour and tag.

Sample project planning map, synced to Outlook and with Outlook categories applied


Any changes you now make to a task in either program – including category changes – should be reflected in the other once the tasks are synced. Just remember that while multiple categories can be assigned to a task in either program and the text tags are visible in both, MM has no capacity to display multiple colours and therefore topics with multiple categories will have no background colour.
This may be all that some people need to do if they just want to manage tasks from their MM project maps in Outlook, but once this relationship has been established you can use it as a basis for setting up proper dashboard maps where the use of Outlook is optional. I’ll describe this in my next post.

Pingback: Using MindManager dashboard maps with Outlook: part 2 | Sociamind
Pingback: Using MindManager dashboard maps with Outlook: part 3 | Sociamind
Pingback: Using MindManager dashboard maps with Outlook: part 4 | Sociamind
Pingback: What happened in Sociamind in 2015? | Sociamind
Pingback: MindManager 2017’s new features in action – 2: dashboard maps (2017.178 update) | Sociamind